Never Land in Spam: GoHighLevel 2024 Email Setup Tutorial (Google and Yahoo Update)
🤖 GoHighLevel
Written By: Keaton Walker

Join over 15,000 Subscribers Enjoying My Newsletter:
The No B.S. Guide to Attracting Your Ideal Clients on Autopilot - No Matter Your Follower Count
The No B.S. Guide to Attracting Your Ideal Clients on Autopilot - No Matter Your Follower Count
Never Land in Spam: GoHighLevel 2024 Email Setup Tutorial (Google and Yahoo Update)
Are you tired of hearing that tech setup is the only thing you need to get your emails delivered through GoHighLevel (GHL)? Well, I'm here to tell you that it's not the whole story.
In fact, when Google and Yahoo rolled out their new email requirements in February, I thought I had everything set up correctly.
Despite a minor hiccup, I still managed to achieve 99% delivery rates for tens of thousands of emails. The truth is, tech setup is only about 30% of the battle. The other 70%? That's what we're diving into today.
The Four Ways to Send Email Through GHL
Let's start with the tech side of things. There are four methods to send emails through GHL, and I'll walk you through each one:
1. Default Setup (Don't Do This!)
Using the default mg.msgstndr.net domain is a terrible idea. You're sharing your email credit score with everyone who's ever signed up for GHL. This is what the new Google and Yahoo update is cracking down on.
2. Software-Wide Sending Domain
This involves setting up a domain like mail.yoursoftware.com for all your users. It's a solid solution that can get you pretty far, but there are some deliverability concerns.
3. Individual Subdomains for Each Subaccount
Create subdomains within your own domain for each client, like joescrapshack.yoursoftware.com. This isolates each client's reputation and is easier to set up than option 4.
4. Dedicated Domain for Every Subaccount
This is the gold standard for deliverability but can be time-consuming to set up for each client. It's essential for your own business and highly recommended for clients who are serious about email marketing.
Setting Up Your Chosen Method
For this tutorial, we'll walk through setting up a software-wide sending domain. This method provides a good balance between deliverability and ease of setup.
1. Log into your GoHighLevel account and navigate to the agency settings.
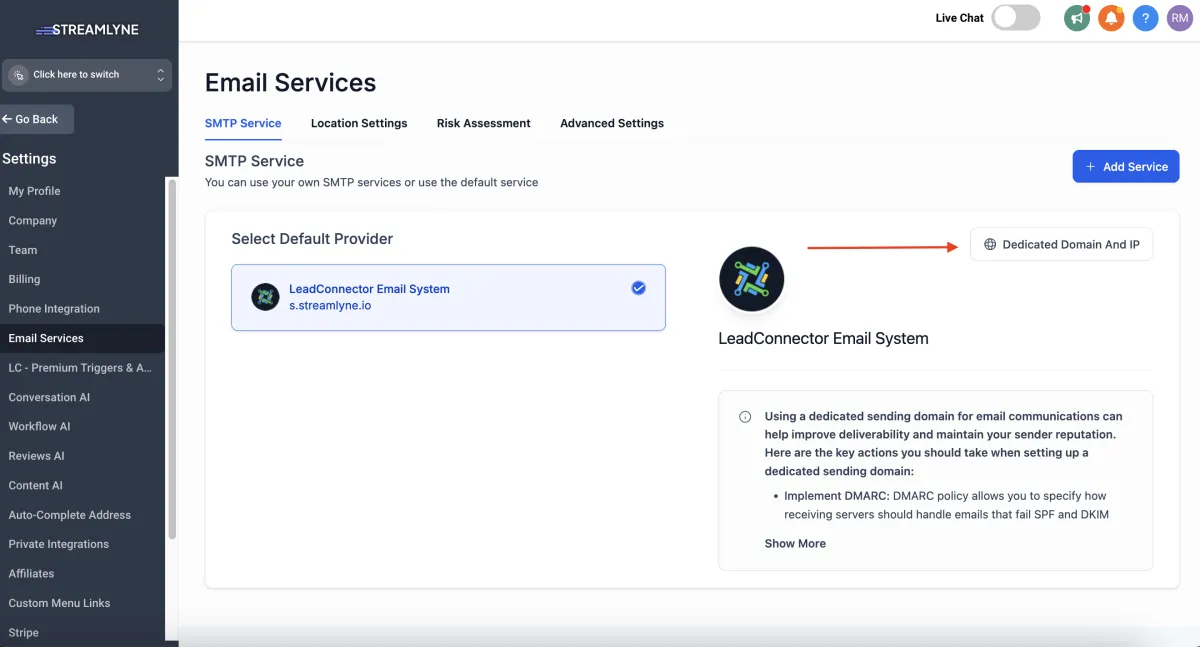
2. Click on "Email Services" in the left sidebar.
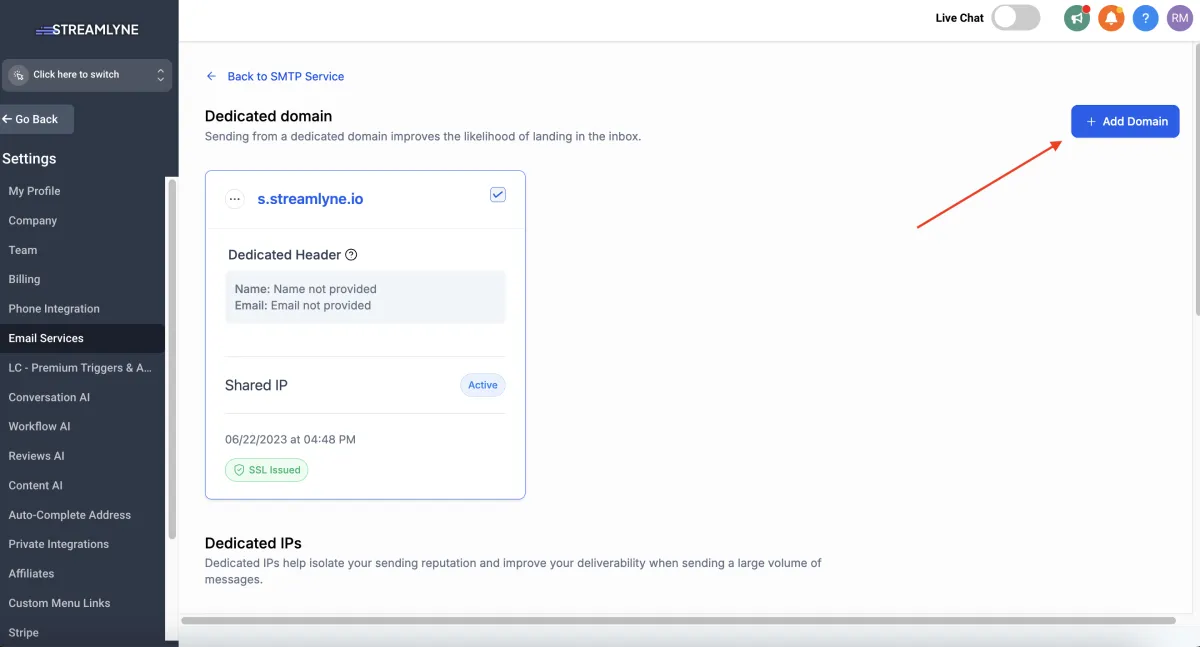
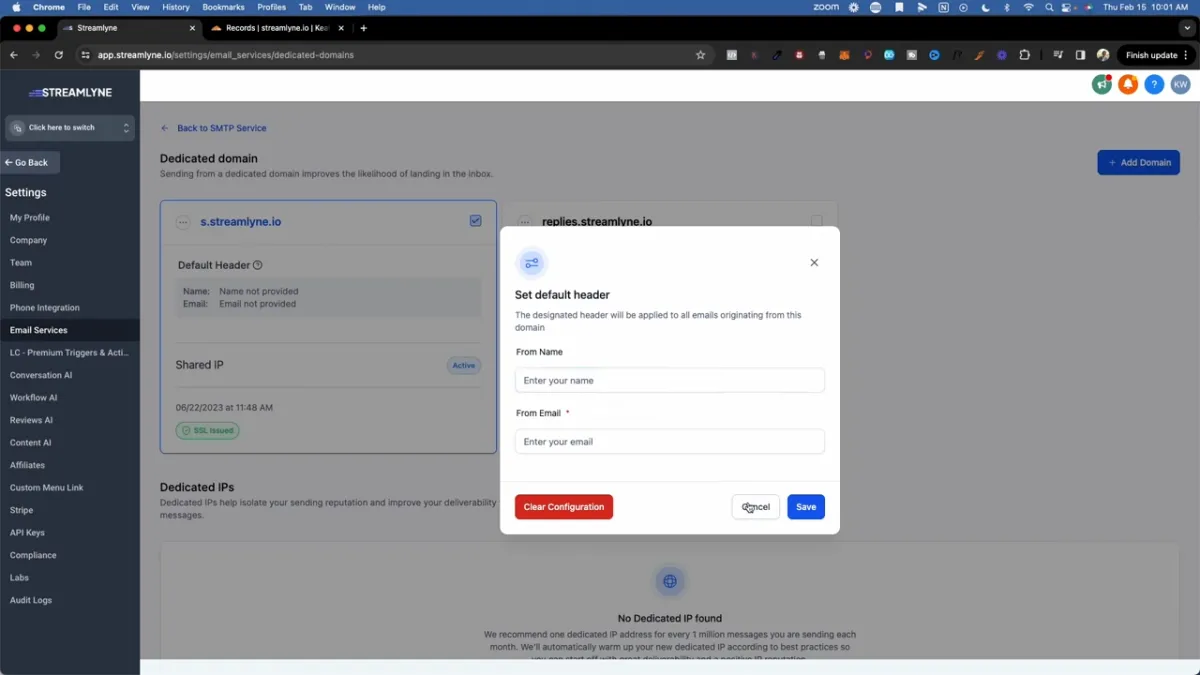
3. In the "Dedicated Domain" section, click "Add Domain".
4. Enter your desired subdomain. For example, if your software is called "Streamlyne", you might use "s.streamlyne.io" or "mail.streamlyne.io".
5. Click "Add and Verify".
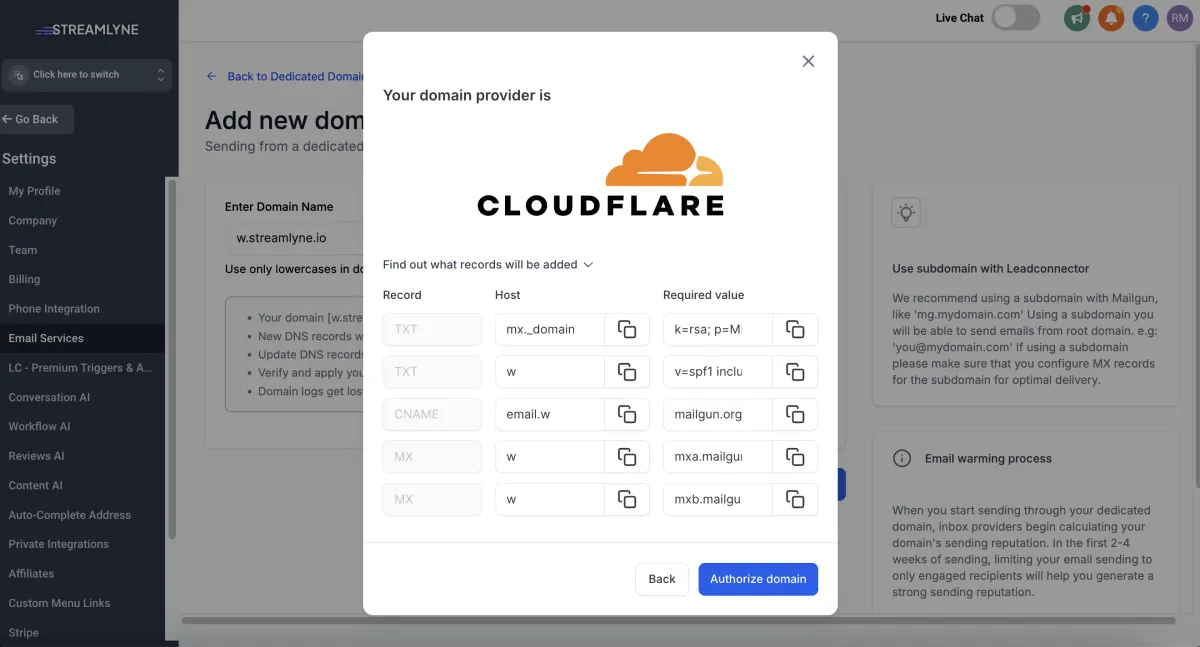
6. GHL will now show you the DNS records you need to add. If you're using Cloudflare or certain other providers, you may see an option for automatic setup. If so, click "Authorize Domain" and follow the prompts.
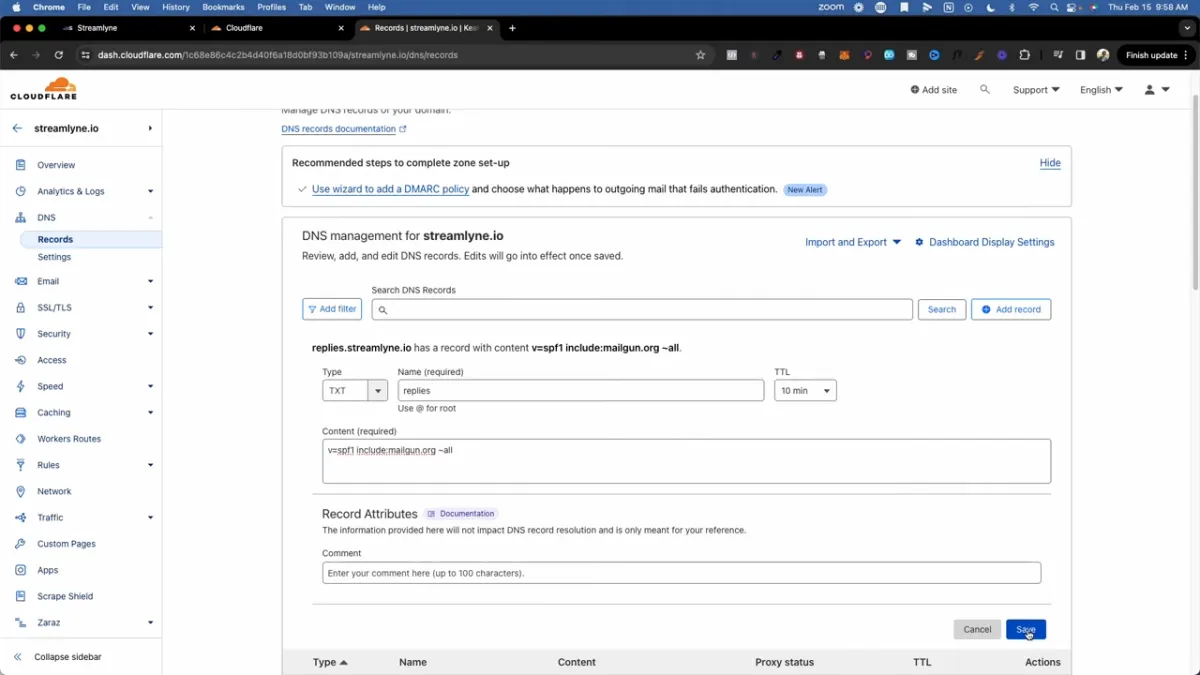
7. If automatic setup isn't available, you'll need to add the records manually. Here's how: a. Log into your DNS provider (e.g., Cloudflare, GoDaddy, HostGator). b. Navigate to your DNS settings or DNS management area. c. For each record GHL provides, create a new DNS record:
➤ For TXT records:
▻ Type: TXT
▻ Name: Use only the subdomain part (e.g., "s" or "mail")
▻ Content: Copy the full content provided by GHL
▻ TTL: Set to 10 minutes or the lowest available option
➤ For CNAME records:
▻ Type: CNAME
▻ Name: Use only the subdomain part
▻ Target: Copy the full target provided by GHL
▻ TTL: Set to 10 minutes or the lowest available option
8. After adding all records, return to GHL and click "Verify Domain".
9. If verification is successful, you'll see green checkmarks next to each record. If not, wait a few minutes and try again, or double-check your DNS entries.
10. Once verified, you can set up your email headers. Click on "Email Headers" and enter your default "From" name and email address.
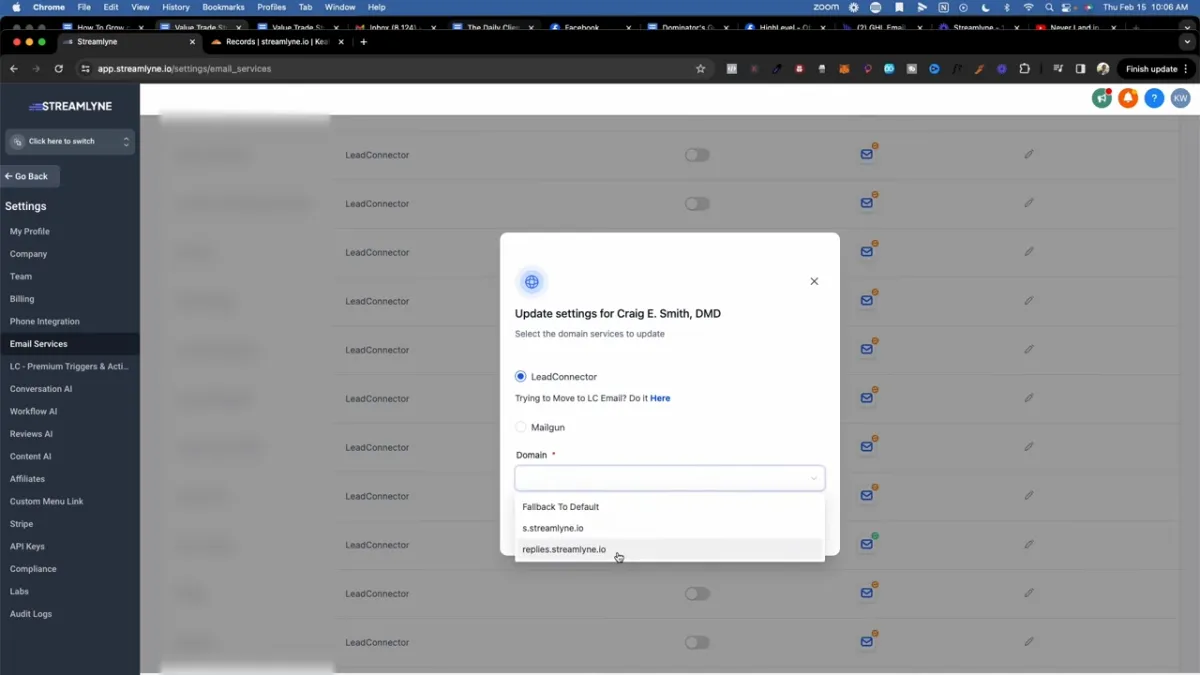
11. Finally, navigate to "Location Settings" and assign your new domain to each sub-account that should use it.
Congratulations! You've now set up a software-wide sending domain. This setup will significantly improve your email deliverability compared to using the default GHL domain.
While this method is effective for many businesses, those sending very high volumes of emails or with strict deliverability requirements may want to consider the dedicated domain method (option 4) for each sub-account.
Now that your domain is set up, let's move on to the crucial DMARC record setup...
The DMARC Record: Your New Best Friend
Setting up a DMARC record is crucial for preventing email impersonation and improving deliverability. Here's how to do it:
Follow these step-by-step instructions to set up your DMARC record:
1. Log into your DNS provider (e.g., Cloudflare, GoDaddy, HostGator).
2. Navigate to your DNS settings or DNS management area.
3. Look for an option to add a new DNS record or add a new TXT record.
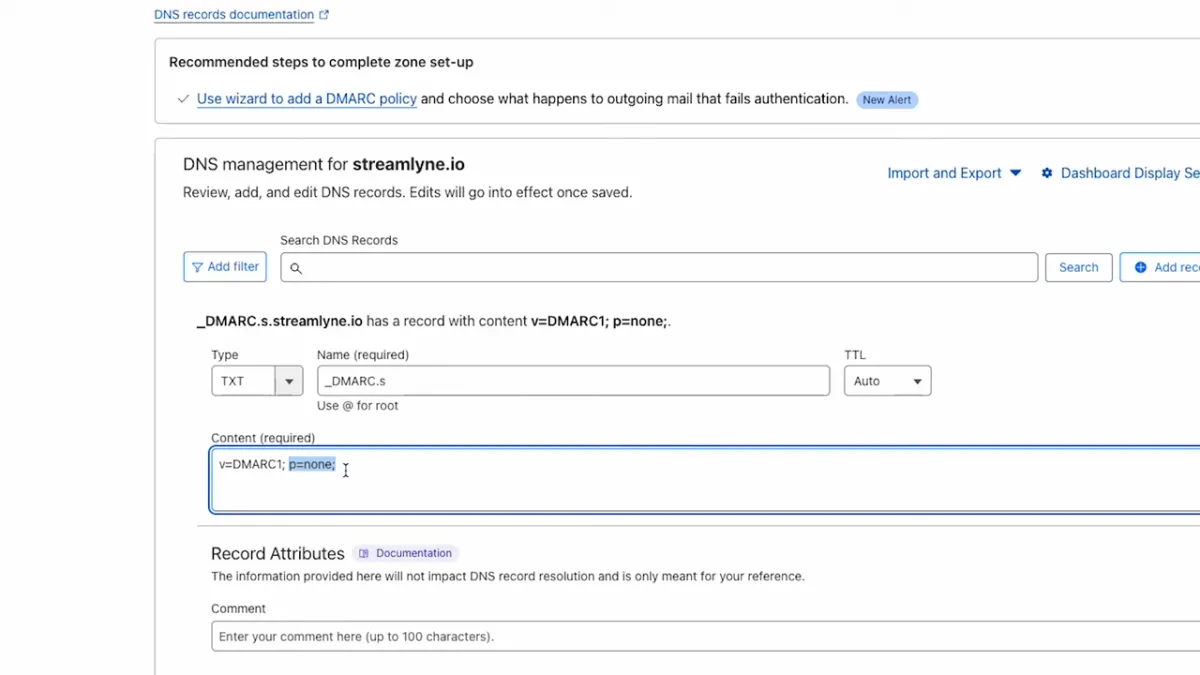
4. For the new TXT record, use the following settings:
▻ Type: TXT
▻ Name/Host: _dmarc.yourdomain.com (replace 'yourdomain.com' with your actual domain)
▻ Value/Content: v=DMARC1; p=none;
▻ TTL: Set to 3600 seconds (1 hour) or the lowest available option
5. Save the new record.
6. Verify your DMARC record setup by visiting https://dmarcian.com/dmarc-inspector/
7. Enter your domain name and click "Check my domain."
8. If set up correctly, you should see a message confirming a valid DMARC record.
Note: The 'p=none' policy is a good starting point. It tells email receivers to monitor and report on emails from your domain without taking any action. As you become more comfortable with DMARC, you can consider stricter policies like 'p=quarantine' or 'p=reject' for enhanced security.
Remember, DMARC works in conjunction with SPF and DKIM records, so make sure those are properly set up as well for maximum effectiveness.
By following these steps, you've taken a significant stride in protecting your domain from email spoofing and improving your overall email deliverability. This simple setup can make a big difference in how email providers treat your messages.
Beyond Tech: The Real Secret to Email Deliverability
Now that we've covered the tech setup, let's dive into what really matters: reputation and content.
Email Reputation Checklist
When you send an email, recipients can take six actions:
1. Open it
2. Reply to it
3. Click on links
4. Bounce (email not delivered)
5. Unsubscribe
6. Complain (mark as spam)
Your goal is to maximize the first three and minimize the last three. It's all about providing value and respecting your subscribers.
Crafting Email Content That Delivers
Pay attention to these elements:
- From name and email
- Subject line
- Preview text
- Email body
Avoid clickbait, spammy words, and excessive HTML. Keep your fonts standard and your content valuable.
Use these tools to see if your emails will go to spam:
Pro Tip: The Newsletter Hack
Here's a game-changing strategy: Send valuable newsletters to your entire list, but only send promotions to those who've opened your value content. This maintains your reputation while maximizing engagement with your offers.
Warming Up Your Email Sending
Start slow and steady. Begin with about 1,000 emails a day and gradually increase by 500-1,000 daily. Consistency is key – avoid sudden spikes or drops in your sending volume.
Successful email marketing is about more than just technical setup. It's about building relationships, providing value, and respecting your subscribers. With these tips and the right tools, you'll be well on your way to email marketing success.
Happy emailing!
Ready to Level Up Your Email Game?
If you're ready to take your email marketing to the next level with GoHighLevel, I've got an exclusive offer for you. Sign up or upgrade your GHL account (or any of the other tools on this list) using my affiliate link and you'll get access to over $8,000 worth of bonuses, including:
- Access to our exclusive community- Over 20 in-depth courses- Ready-to-use templates and resources- Monthly coaching calls
Don't miss out on this opportunity to supercharge your email marketing efforts and join a community of like-minded marketers. Click here to learn more and sign up.
Join The Daily Dominator
The No B.S. Guide to Attracting Your Ideal Clients on Autopilot - No Matter Your Follower Count
The No B.S. Guide to Attracting Your Ideal Clients on Autopilot - No Matter Your Follower Count
Daily insights trusted by 15,516+ Dominators.
"Just hit 10 Agency Clients, 0 came From Outreach" - Matthew F. - 100 Followers
"Going to finish this month around 40k in rev" - Matt L., 8k Followers
"$8k this month, all built from inbound" - Oliver S., 1.3k Followers

